Thursday, December 31, 2020

Bigfoot, the Loch Ness Monster and Alien Sightings...

 What do those things have to do with the gun world, you ask?  Well, the answer is simple: Like certain things in the gun world, they don't exist, yet people swear that they have seen them.  

One common example of the gun world equivalent of a Bigfoot sighting is the "16 gauge built on a 20 gauge frame".  Now, almost everyone who has ever spent any amount of time around doublegun guys of a certain age has heard someone brag about their gun that has the above-mentioned configuration, or some variant thereof, like a 20 on a 28 frame, etcetera.  The thing is, there is no such thing.  That's right, there is no such thing as a 12 on a 16 frame, a 16 on a 20 frame, a 20 on a 28 frame or an anything-else on an any-other frame.  

This is because there is not now, nor has there ever been, an industry standard for frame sizes of any gauge, for any break-action gun.  There have been manufacturers that have made use of different frame sizes for different gauges but in the case of American makers, usually there was one size.  Often, the only difference between a 12 gauge and a smaller-bore frame was the bore-center spacing and the corresponding size of the fences, with the actual bar of the frame remaining the same size.  These are not small frames because the entire frame was not scaled down proportionately for the smaller-gauge applications. 

The standout exception to the above rule is the Fox gun.  Fox made two frame sizes (not counting the Super): large and small. The large frames were all twelves, while the sixteens and twenties shared the same small frame, which was scaled down in all dimensions.  Some owners of Fox sixteens will brag to all who will listen that their guns are really built on "20-gauge" frames, because a well-known gunwriter once wrote this entirely subjective opinion in his book on the Fox.  If that's what they want to believe, more power to them but it doesn't make it true.  It could just as easily, and no less accurately, be said that the Fox twenty is built on a sixteen gauge frame but no one will ever say that because it doesn't sound "cool".  Where the Fox is concerned, there are twelves and small frames, period.

There were Parkers made in 12 gauge on their #1 frame.  Does that make it a 12 on a 16 (or 20) frame?  No, it makes it a 12 gauge on a #1 frame, in exactly the same way that a 12gauge Parker on a #3 frame isn't a 12 gauge on a 10 gauge frame.  It's just a 12 on a #3 frame.

Where a manufacturer actually does make a frame that is specifically scaled to each caliber, things are still not definitive, because one maker's idea of a scaled frame may not be the same as another maker's, for the same caliber.

Another entertaining (or annoying, depending upon one's mood) bit of nonsense is hearing descriptions of the "grade" of walnut that a gun wears.  One will hear terms like AA, AAA, AAAA, Triple X, Exhibition-grade, ad nauseum.  This is also high-grade hogwash for the same reason.  There is no industry standard for grading wood.  Anyone can call any piece of walnut anything that they want, it's completely subjective.

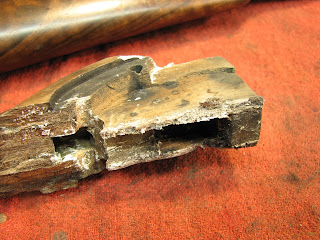
Some more "pulled-from-the-ass wisdom" is that if a shotgun's barrels don't actually meet at  the muzzle, then they have definitively been cut.  The rationale behind this is usually along the line of  "the factory wouldn't let something like that go out the door".  Yeah, OK, as if "the factory" were some temple of righteous perfection in craftsmanship.  Those that subscribe to this line of thinking would literally not believe some of the examples of factory-original misalignment of barrels that I've seen on American doubles.  Here's a of photo of something that, according to some, would never have left the factory.  Unlike those grainy Loch Ness Monster photos, this is actually real.


Friday, December 25, 2020

Colt Model 1849

Colt's "open top" percussion revolvers, regardless of caliber, are all basically the same design: a frame with no top strap and completely open at the front.  Think of an "L" laid over on its long leg with the short leg being the rear of the frame.  The spindle upon which the cylinder rotates is screwed into the rear of the frame and its front end extends some distance beyond the front of the cylinder.  The barrel's structure serves as the forward portion of the frame and is located in part by the extended portion of the cylinder spindle.  This extended portion of the spindle is pierced by a horizontally oriented rectangular slot, which aligns with a mating slot in the barrel, and receives the barrel wedge which holds the whole works together.

With the barrel secured axially to the frame about the cylinder's axis, some method is needed to prevent the barrel from simply rotating about the cylinder spindle, and to establish and maintain the bore's alignment with each of the cylinder's chambers.  This is accomplished by the use of two locating pins on the forward end of the frame, that engage mating holes in the rear of the lower structure of the barrel, where it mates with the frame.  Those pins are the subject at hand, as they were both broken away on the subject gun.

The barrel locating pins are actually not pins at all, at least not as originally manufactured.  The locating "pins" are actually machined as part of the frame and breakage of these locators isn't an unheard of event.

Abrupt section changes and sharp inside corners are best avoided, if possible, in any design.  Colt's barrel locating method exhibits both: the section change from the frame bar to the locators, and, the sharp inside edge formed where the locator meets the frame bar.  That said, the most common contributors to the breakage of these locators are ham-fisted disassembly and worn, loose-fitting barrel wedges which allow the barrel assembly to "float" on the frame assembly, abnormally stressing the locators. 

There are two possible methods for repairing this damage.  One method would be to anneal the case-hardened frame, weld up enough material to remachine the locators, then polish, prep and reharden the frame.  This method would be rejected for the following reasons: The new pins, even after rehardening, would not be as sound as the originals because the originals were machined from the frame's forging and the built-up pins would effectively be castings (welding is really nothing more than casting in-place).  The second reason is that welding would destroy the original finish, or patina, whichever the case may be.  This is generally unacceptable to Colt collectors.

The second method would be to drill the frame to accept new tool steel pins.  This would be done after fixturing the frame in the mill and establishing the center of each of the locators.  The new pins are made .001" over the size of the holes in the frame.  Before installation, the pins are frozen and the frame is heated to between 250 and 300 degrees (Farenheit), the pins are then pressed into the frame and when the temperatures equalize, the pins aren't going anywhere any time soon.  The pins are then machined to the proper height and their ends are radiused.  

In the first photo, it is obvious how close the outside diameter of the locator is to the edge of the frame's upper surface.  This precludes drilling the holes to the full diameter of the pins.  The solution is to make the pins "stepped" with the smaller diameter inside the frame.  The step in the new pins is actually a short taper that matches the taper of the counterbore in the holes that are machined into the frame.  This is a royal pain to machine but it minimizes the stress concentration where the diameter changes.  Is it absolutely necessary?  Probably not, but it makes me feel better.


The gun was also missing the front triggerguard screw.  A new screw was made and finished, then the finished was "worn" to match with the rest of the screws.


Monday, November 30, 2020

A Sauer Boxlock

 This gun came in for a butt extension and straight hand conversion, which sounds pretty straightforward, and would have been, except for the fact that the stock had been previously refinished.  Now, a prior refinish in and of itself isn't necessarily a problem but when the prep work for that refinish was done with a floor-sander, well, things get a bit more interesting.  The cheeks (side panels) of the stock were so dished out, they could have held a pint of water.  Naturally, the edges were sanded below the metal as well.  There are those who, for whatever reason, feel qualified to work on the wood components of a gun.  Many of these individuals would at least hesitate to work on "the metal", but wood, they dive right in.  I blame high-school wood shop and hubris.  Stock making and finishing is not carpentry.

 Any-hoo, here goes.

The damage is obvious.  The result of a "can do" attitude, combined with a "can't do" skill set.


The cheeks were machined flat and veneers were applied, along with material for the extension and a plug for the sling swivel stud hole.


The finished job.


NO, Super Glue Does NOT Work!

 This would fit in the category of stupid shit you read on gun forums.  There are those that think that super glue (cyanoacrylate) is some sort of cure-all for damaged wood.  They will evangelize to the masses about the superior "penetration" properties (due to its low viscosity) and how it will harden and "stabilize" (whatever the hell that means in this application) the wood.  All nonsense.  Out here in the actual world, facts don't care much about consensus on forums.  Thin cyanoacrylate is most effective on NON-porous materials.  I know it bonds skin very well but skin isn't wood.  It does NOT penetrate to anywhere near the depth that some believe, nor is it as strong as some believe.  It is, in fact, extremely hard and brittle when cured and becomes more so with age.  I'm not saying that it has no use in the gun world, it is superb for repairing nicks in the high-gloss, infinitely cheap-looking finishes on Brownings and Weatherbys.  It's also very handy for temporarily fixturing things but is has no place in the structural repair of a stock or forend.

Here is an example of a stock that was repaired (and no doubt "stabilized") with super glue.  It's an Arrieta that wasn't worth the expense of restocking and, since all of the pieces were there, it was well within the realm of repairability.  Besides, I like a challenge.  That challenge was provided in the form of removing all of the previously (and liberally) applied glue.  Luckily, acetone does dissolve it, eventually.


The same stock, after being correctly repaired.


Sunday, November 29, 2020

Yeah, I'm Still Here.

 No, the title has nothing to do with the, ahem, "pandemic".  Rather, it has to do with my departure from Instagram.  Yes, I actually had an account on the 'Gram, because everyone said "that's the place to be" if you want to be seen.  Seen by whom, that is the question.

I have since come to a few realizations.  The first is that it is an arm of Facebook, the second is that, much like FB, the accumulation of "likes" and "followers" is the actual goal of being on the platform.  The level of vapidity and shallowness is utterly astounding.  It truly is nothing more than a bunch of people shouting: "Look at me!"  Much like internet forums, it's a place where people show off that which should probably remain hidden, at least if things like objectivity and shame actually existed anymore.  Also like internet forums, it's a place where mediocrity and the mundane are celebrated.  Like all "social media", it's actually anti-social because it subverts personal, human-to-human interaction.   

Besides, if a gunsmith has time to hang out on forums, F-book or Instagram, they either don't have enough work to do, or, maybe they're not actually the one doing the work.

So, the blog is once again, and shall remain, my only internet presence.  Everything else just feels too dirty.

Wednesday, November 18, 2020

A New Series (Maybe)

 I think I'll call it "Stupid Shit You Read On Gun Forums".  

Internet forums, and gun forums in particular, continue to prove the validity of Dunning and Kruger's studies.  They remain places where people who couldn't find their own ass using both hands spout "expertise" on subjects about which they know little to nothing.

Our first installment concerns hinge pins and barrel hooks.  The apparent conventional "wisdom" is that the hook is what wears, never the pin, because the pin is "hardened" and the hook "is not".  This "wisdom" disregards the fact that the hook is not made of the same material as the hinge pin, and, that the "hardening" of the hinge pin is usually of negligible value.

 Part and parcel of this wisdom, is the idea that replacing the hinge pin in order to correct an off-face condition is hogwash: "Just weld up the hook and refit" (usually with a Dremel) is the correct course of action, according to the terminally ignorant.  How does one weld up the hook of a Model 21 when it's off the face (sorry fan-boys, it does happen)?  What about welding the hook of chopper lump barrels (which have a braze seam running right down the center of the lump)?  I have seen both of the above examples welded by gun plumbers, both American and English, and it's not pretty.

The hinge pin in most break action guns is made of the same (or similar) material as the frame in which it resides.  That material is a low-carbon (sometimes very low), plain steel.  These steels are non-hardenable on their own due to their low carbon content and so are (in this application) surface hardened (case hardened).  Without getting into a long-winded dissertation on the subject, case hardening is a process whereby extra carbon is added to the steel at the surface and, to an extent, below the surface.  This makes the surface effectively hardenable.  Case hardening consists of numerous steps, the first (assuming a virgin part) is carburizing, wherein the carbon is added to the surface via a combination of heat and an external carbon source.  The second step is the actual hardening,  which consists of heating and quenching the part, so as to transform the now more carbon-rich surface (the steel below the surface remains unhardened) and the third step (usually ignored by gun manufacturers) is tempering of the part.  Depending upon certain variables, the hard "case" that forms on the part can be relatively deep (.060" or more). 

Gun manufacturers, for reasons unknown to me, tend to skip the individual first carburizing step and combine it with the hardening step.  While this does save time, it also results in a much thinner "case".  The hard surface on a frame rarely exceeds a few thousandths, often being .005" or less, usually much, much less.  This seems to be because case hardening is used in the gun world as more of an ornamental "finish" than a functional surface treatment.  Now, with a hard skin that thin, one might surmise that the soft steel below would be free to deform just as easily as without the hardened layer.  One would be correct.  Once the very thin hardened layer wears off (or through), wear accelerates rapidly.  This is especially true in American doubles because the vast majority of those use the hinge pin as a structural element, meaning it reacts the forces generated upon firing, rather than being only a pivot around which the barrels rotate to open or close.  In simpler terms, when these guns are fired, the hinge pin is what keeps the frame from departing to the rear.  When the gun is fired, the hinge experiences the same force that the breechface does, but in the opposite direction and over a much smaller area.  This force is also offset to one side or the other, depending upon whether it is the right or left barrel that is fired, causing the barrels to try and yaw about the hinge.  This causes deflection/deformation of the pin, which accelerates wear of the very thin hard skin, because the hard skin is much less flexible than the steel beneath.


The fact is that the internet experts are wrong, again, as usual.  In American designs it IS usually the pin that wears and replacing the pin IS the only correct remedy.  Now, correct means different things to different people but I prefer the dictionary's definition of most words.  Below are examples from this very blog that illustrate the point.  I've done many, many more prior to starting the blog and on guns that simply were not interesting enough to make it here.  Also, contrary to what the "experts" say, a new hinge pin, when done properly, does not "stick out like a sore thumb".  They are, in fact, indistinguishable from original.

Ithaca NID


Barovnik


L.C. Smith


Fox SBT

 Fox Sterlingworth


Now, given that the hinge pin is worn, and the worn area is almost never a perfect arc, how does one weld and refit the barrel hook so that it maintains full contact while traveling around the worn pin?  Answer: It can't be done.


Friday, September 25, 2020

A Cautionary Tale

I know it's been a while since the last post but as the great Mark Twain once said: The rumors of my demise have been greatly exaggerated.  Now on to the business at hand.   The victim is one comprehensively cocked-up Henry Atkin SLE in 12 gauge, and the title is an allusion to the pitfalls of buying a gun from a "reputable dealer" without a pre-purchase inspection/evaluation.  This turned out to be one of those repair projects that ends up feeling as if it's become a career.   Not one single area of this gun was spared the handiwork of at least one "gunsmiff".   If one individual was responsible for all of this, then I've got to tip my hat to him for elevating incompetence to a level that I didn't think possible outside of Washington D.C.  To be fair, not all of the problems were attributable to bodgery, a couple were the result of actual, honest wear and tear.  We'll start there. 

 The first thing found upon disassembly was that both lockplate anvils were failed.  The anvil is what the tumbler stops against when released by the sear and, as you might imagine, it takes a beating (literally). 


After annealing the lockplates, the broken areas were prepped and TIG welded up in preparation for reshaping. 


 The anvils were filed to shape and the interior surfaces were polished in preparation for case-hardening. Since the gun exhibited no case hardening color externally, the colors were removed from the exterior surfaces in order to render the repair externally undetectable.

  Apparently, some trigger-pull work was done to the left lock.  The primary sear's nose was shortened and reshaped (presumably to lighten the trigger pull).  When our hero discovered that the primary sear now released the tumbler before the interceptor sear cleared, he took the "expedient" method of correcting the situation: grinding off the nose of the interceptor.  Astute readers will readily surmise that this rendered the interceptor incapable of performing its function of actually intercepting the tumbler in the event that the primary sear fails to hold.  Since welding these parts is a non-option because of the material from which they're made (see here for more detail:https://vicknairgunsmithing.blogspot.com/2020/01/can-we-just-stop-with-this-shit.html), new parts had to be made.

Completed left lock


The locator tab on the interceptor sear spring of the right lock had also failed.  The attempted solution was to file the back side of the spring, in an attempt to recreate the tab.  I'm sure it seemed like a good idea at the time.
 
The last frame-related item was a broken toplever spring.  We've all seen this before, but here are a few photos anyway.

Now, on to the ejectors, where the perpetrator didn't let a complete lack of comprehension as to their function get in the way of "fixin' em".  After filing the legs of each sear so thin that they actually slipped past the trip lever noses, our man then proceeded to peen the legs, presumably in an attempt to lengthen them.  Why?  I don't know, and neither did he.
The ejector sears are pretty complex in their shaping because the forend wood occupies the space in between them, allowing purchase for the rear forend iron screw.

A kludge-fest of this magnitude wouldn't be complete without mangled screw slots.  Somehow or other, our man actually missed one screw slot with his talents.  In order to relieve this single screw of its "survivor's guilt", I made new screws to replace the damaged ones, a few of which are shown here.  Again, we've all seen this before.

There were also stock repairs that had to be made, as well as refinishing of the stock and forend, recutting the checkering and an ebony extension (1").  The barrel engraving was recut and the barrels reblacked as well.  I didn't take any photos of those operations, mainly because blogging about it was not foremost in my mind at the time.
 
At last, the finished job...