The victim this time is a Fox Sterlingworth in 16 gauge. The owner complained of intermittent misfires on the right and consistent failure to fire on the left barrel, as well as having to push the barrels further open in order to load and unload the chambers. Upon disassembly, the previous "gunsmiff's" complete lack of mechanical comprehension was laid bare.
Our man apparently thought that sliding a small diameter coil spring into each of the original mainsprings would "boost" their power. He also apparently though that one of them needed "more power" than the other, since he used two different springs.
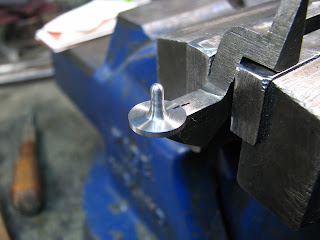
Also seemingly unaware that, even though 16 and 20 gauge Foxes share the same frame size, their bore-centers and heights are different, he installed a 20 gauge hammer in the left side. The 20 gauge hammer's "nose" (or firing pin) is lower (closer to the pivot) than that of the 16. As you might imagine, it doesn't align very well with the hole in the breechface. Our man seems to have discovered this inconvenient fact, and set about attempting to correct it, unsuccessfully. He actually attempted to get the nose to protrude further, even though the misalignment between the nose and the hole was causing the interference.
Correcting this was no different than repairing a broken hammer nose. The original nose is machined away, a locating hole is drilled in the proper (for a 16) location and a new nose is silver-brazed in place. This method is entirely in keeping with best practices for multiple reasons, they are as follows:
- the hammers are oil-hardening, so welding is verboten.
- Fox hammers are only heat-treated at the sear notch, so heating only the upper extremity has no effect on the part's strength.
- the hammer nose and the "impact pad" below it are actually the least stressed parts of the hammer, and a properly made silver-braze joint far exceeds the strength requirements in this application.
- OEM Fox parts are no more, and making an entire hammer for a Sterlingworth would be cost-prohibitive.


That takes care of the hammer, now we move on to the sears. Remember the complaint about having to further open the barrels to extract or insert the shells? That was caused by having to actually lift the hammers (with the barrels) beyond the point where they are cocked. When everything is right, the hammers will be cocked just as the barrels open to the point where the rims clear the fences. When the hammers reach the cocked position before this point, one experiences the above problem. One also experiences misfires caused by light primer strikes due to the fall of the hammers being shortened. What causes this? The relation between the hammer and the sear. More specifically, the length of the sear nose, which is the area ahead of the pivot. The longer this is, the longer the distance the hammer will fall. Obviously, the shorter this distance, the shorter the hammer's travel. This is one of the reasons that trigger-pull work should never be undertaken by someone that doesn't understand how the entire system works, such as our man here. He apparently also "adjusted" the trigger pulls by knife-edging the sear noses and, in the process, shortening them beyond salvage. Since the sears are made of the same material as the hammers, and the nose is the only portion that is heat-treated, welding isn't an option. Replacing them with new factory parts is also, as of now, no longer an option, so new sears had to be made from O1, fit and heat-treated.


Once the sears were fitted, the noses are heat-treated and the engagement is set using a shop-made jig.
The finished sears,
Except for a few other minor issues that I won't cover here, that takes care of this job. Just remember, the next time a shooting buddy says "I know somebody who can fix that for ya, cheap too." Beware.


