In a previous entry, I tried to illustrate the folly in comparing machine-made production guns to "best quality" guns. In hindsight, I failed to mention a point that they both share in common: uniqueness, or more accurately, the lack of same. The English (or Scottish) best of 2019 is in fact the same gun that it was in the late 19th century, with each of the major makers using what became their respective "signature" designs. Beyond stock dimensions, barrel lengths and (sometimes) decoration, the core design of the gun remained the same (and continues to do so). Indeed, an apprentice's first tasks are to make the templates and tools required to assure that his work is as nearly the same as his master's as possible, just as the master had done when he was an apprentice. Technology marches ever forward and the materials used by these makers is better than ever. Technology delivers, to the worker at the bench (the nameless men that actually build the name gun), parts that are more nearly finished than ever before. In fact, some of these parts are so nearly finished that the "gunmakers" of today are little more than fitters. Factually, many of today's bests are really little more than highly finished, limited production guns with bespoke dimensions and decoration (that is assuming that the "house style" of engraving was not specified). This is so thanks to the replacement of time-consuming hand work with computer-controlled machining. At many makers, gone are the days of the actioner skillfully chiseling the frame contours with chisels of his own making, that's now done in the CNC programming, along with many other operations which were once performed by skilled, actual gunmakers. With the gun first created in "virtual reality" and so much less hand work involved, one does wonder why the price of a modern best is so high, especially considering that one of the biggest names in best gunmaking now makes guns "for stock", presumably for the buyer who just can't wait for a bespoke gun. It might even be said that the buyer is paying for something that he is not receiving, because he believes that he is purchasing a handmade gun when in fact, that gun is mostly made on CNC machinery. Also, while one can go into any of these makers and order a gun "made to measure", the buyer is still choosing from a very limited menu as far as the actual design of the gun is concerned. At the "biggest names" there is in fact no choice at all and that should further lead one to ask: If this design has been made for the last 100 years (at least) and the production has been streamlined to the nth degree, what justifies the cost?
What to do if our fictional buyer wants a gun that doesn't seamlessly blend into the other bests on the rack at the gun club? What if having something to brag about other than an artificially inflated price tag is wanted by the buyer? What if our buyer actually decides to follow what may be the only good piece of advice in gundom (buy the gun, not the name)? Assuming that our buyer can handle the slings and arrows of his fellows at the gun club, asking things like: "Why didn't you buy a (insert socially-acceptable brand here)?" and: "Are you sure that was a good investment?", he can seek out an independent gunmaker who is willing and able to provide exactly what he wants. That being a unique, best quality gun that actually is hand made. He didn't want a "fill-in-the-blank best" because, let's face it, while they're really nice and well made, there is almost nothing to separate them (within makes, I.E., one Purdey from another) and beside that, he's not a conformist. He doesn't see it as an "investment" because he knows that there are only two kinds of people for whom a gun is an investment with an expected return: dealers and fools. He sees the value in a unique (hand made) gun versus a best (hand finished) gun. While the price will be substantial, he realizes that cost and quality are (and should be) commensurate, while one can hardly put a price on "uniqueness". These individuals, the ones who prize individuality over brand recognition, and careful craftsmanship over slick marketing, do exist but they're a pretty rare breed. After all, it does take a bit of courage to stand apart from the crowd.
Thursday, October 24, 2019
Tuesday, October 22, 2019
A Word About Modern Gun Care Products
Many modern gun care products are quite simply incompatible with the finishes used on classic and custom firearms. Many of these products contain silicone, teflon or some other type of "high-tech chemical enhancement" that is touted as the last word in gun protection, usually because these additives are used in some form in some unrelated industry. It's called marketing, which is the way bullshit is spelled in the language of business. The biggest hazards posed by these products are to organic oil-based
stock finishes, including any variation of "London" oil finishes and
oil-based film-type finishes. Silicone (NOT silicon, which is what computer chips are made from) rags and sprays should not even be in the same zip-code as a gun with an organic stock finish. Regardless of whether it's a spray or on a rag, IT WILL PENETRATE ANY ORGANIC STOCK FINISH and it will soften and ruin it. As a side benefit, it will also completely prevent refinishing unless the contaminated original finish is chemically removed. Depending upon the depth of the silicone contamination of the wood, complete removal ranges from merely damnably difficult, to almost impossible.
Keep the following AWAY from ANY organic stock finish:
- Silicone, in any form, be it spray, oil or cloth
- Rem-Oil in any amount, or really any gun oil for that matter
- Gun Scrubber, this stuff will dissolve even some synthetic finishes and some plastics
Probably 90 percent of the gun care products that exist only excel at separating money from one's wallet and the above are actually capable of damaging a fine gun's finishes. A good oil that doesn't contain silicone, teflon or powdered space-shuttle tiles is all that is needed for the metalwork and if you feel the irresistible urge to fondle the wood, please only use a drop or two of boiled linseed oil. Do NOT use LIN-SPEED or TRU-OIL (or their like) as "maintenance". These are FINISHES (they are in fact varnishes), they are not used for maintenance any more than one would wipe one's car down with fresh paint to "freshen it up". Speaking of cars reminds me of waxes and there is a certain brand of very expensive wax that some museums use, and many gun owners as well . Do not use this on any stock that you ever plan to have refinished either.
There, you can't say that you were not warned.
I'm probably going to be asked: "Well then, you miserable prick, what do YOU suggest that I use?"
I'm glad you asked. Below are my recommendations.
For general use (lubrication and "wiping down" of metal):
- Break Free CLP - I know, it's supposed to have teflon in it but it must be a damned small amount. In thirty years of using it, I've never seen it cause any issues with any finish. Use it SPARINGLY though, it will migrate everywhere if over applied.
- Hoppe's Original Gun Oil - Still the best mineral based oil, it contains no "high-tech" or "space program approved" ingredients. Again, as with any oil, use it sparingly. There is a reason that your car has a dipstick and your gun does not.
For hinge pin and bites:
- Mobil 1 Synthetic wheel bearing grease - This is the red grease that I use. In this application it will never get hot enough to turn to liquid and one tube will last even the most enthusiastic shooter at least one lifetime.
- Vaseline - This is the "classic" but its main problem is that in hot weather, it quickly turns from a grease into an oil. This also occurs with extended use, and it can get messy.
For stock maintenance and cleaning:
- Boiled Linseed Oil - A couple of drops rubbed on any stock finish and then wiped off with a soft cloth will lift accumulated dirt off of the surface. To clean out cruddy checkering, use a drop on an old toothbrush, followed by a dry old toothbrush. Dispose of any oil-contaminated rags in a safe manner because of the danger of fire.
One last point: If you store your guns in a safe, and you have the room, it is advisable that you store them muzzle down. The reason is that, even though flat-earthers deny it, gravity actually exists and it will push any accumulated oil into the head of the buttstock. The carpet in the bottom of your safe is much less costly to replace than the buttstock of a fine gun.
Monday, October 21, 2019
A Custom Fox 20 GA (#007)
This started as a Utica Sterlingworth in 20 gauge and despite the sequence number, it is not the James Bond gun. Like #001, #002 and #003, this one will remain mechanically a Fox, but it will undergo extensive cosmetic and corrective surgery. The transformation (as usual) will be documented here.
The major components in original form (the frame, triggerplate, toplever and forend iron have been annealed).


As is so common with small-frame Foxes, everything is as rough as a corn cob. Correcting the finish on the standing breech and action flats will necessitate setting the barrels back with an oversized hinge pin, followed by properly "blacking the barrels down". The triggerplate gaps are a bit easier to deal with.


The cleaned-up frame flats, breech faces and triggerplate fit, along with some rough shaping.


Usually I leave a raised bead around the bottomside curve of the fence, but since the uncaring slobs at the factory didn't leave as much material on the left side of the frame as they did on the right, and the idea of welding on that particular area of the frame doesn't make me feel all warm and fuzzy, I had to do something a bit different. It turned out to be fortuitous because I think that this looks much better, even though it took much more time to execute. Obviously, this will continue into the edge of the barrel flats and forend iron.


The bolsters on either side of the toplever were reshaped and sunken coves were chiseled at the area where the topstrap meets the frame. This was done to create a "layered" look, and the concave edge treatment of the coves ties in well with the lower fence edge. I also narrowed the topstrap so that the bolsters would overhang the stock, adding to the layered look. It also allows the upper stock "horns" to be usefully thicker and therefore stronger. The half-assed convex at the point where the strap narrows was changed to a concave shape that is actually the same on both sides.


Maybe you're wondering about that toplever. After cutting off the majority of the original toplever, new material was welded on and filed up. The racy looking concave thumbpad is only on the left side.


Stay tuned, only a couple hundred more hours to go...
Wednesday, October 16, 2019
Repairing an H.J. Hussey SLE 12 GA
The left lock was cocked but the tumbler would not fall. This usually indicates either a broken mainspring or a broken swivel. If I could pick one, I'd prefer that the mainspring be broken because in that case, there would be no pressure on it. A broken swivel however, that's a different story, because when the swivel fails it leaves the mainspring unrestrained inside the inletting but still considerably compressed. This makes removal of the lock without damaging the wood extremely difficult. There is no way around it because a sidelock gun absolutely can not be disassembled without first removing the lockplates. The best you can do is to slowly work the lockplate away from the stock until there is enough room to reach under the plate itself with a blade-type tool and try to hold the mainspring clear of the wood until the plate is out. This sounds much easier than it actually is. I managed to remove the lock while causing only a minor chip in the exposed wood.
The failed part. Swivels are small but are one of the most time-consuming of parts to make and fit because the "pin" ends are integral to the web and they must be absolutely round and concentric from one side to the other for longest service life.


Most factory swivels are hand filed and the roundness and concentricity of the pins are often, shall we say, less than perfect. The thickness of the web is also often times thinner (and therefore weaker) than it needs to be. I always make the web of a swivel as thick as it can be while still being able to move freely in its slot, as well as "breaking" all sharp edges in order to minimize stress concentrations. This also is the reason that such a small part also gets polished on every surface. I make them from O1 and heat treat them to Rc 48-51.


The left lock, cleaned and reassembled. Looking at the lower photo, it becomes readily apparent how a failed swivel will complicate removal of the lockplate.


Repairng the chip in the stock caused by removal of the lockplate is next.


In addition to the swivel repair, the gun was completely stripped and cleaned and a couple of dents were removed from the barrels. The finished job.


Saturday, October 5, 2019
A Side Pedal Fox (#006)
This gun was first shown in stock form here: https://vicknairgunsmithing.blogspot.com/2018/10/another-high-condition-smallbore.html but it's not going to have much in common with its former self when it's done.
Making an entire gun of one's own design, from scratch isn't the easiest thing to do, but redesigning an existing gun can be far more difficult since one has to "work around" certain design elements that simply can't realistically be altered. That said, I can truthfully state that this project is the most challenging, from a creative standpoint, that I've yet undertaken. That's not only because of the side pedal but also the "island" safety, but I get ahead of myself, allow me to fill in some back story. A few years back, Beretta unveiled a double that they dubbed (double? dubbed? Ha, I kill me!) the "Serpentina". This gun was quite a departure from anything that had been seen prior, as it was completely smooth, sidelever operated, had the aforementioned "island" safety and highly polished barrels left in the white. Now, none of these things individually are without precedent but the way in which Beretta combined them resulted in a gun that was unlike anything anyone had ever seen before. To say that the gun was polarizing may be a bit of an understatement. The "traditional gun guys" didn't get it while some others saw it as the bold artistic statement that it was meant to be. The owner of this Fox was quite taken with the Serpentina and contacted me about making something that pulled inspiration from that gun without being an outright copy, something that was just as slick and smooth but which looks more like a gun than a used bar of soap. The sidelever and island safety were must-haves, as was the completely bald, smooth look but he wasn't particularly keen on the actual shapes of the Beretta. For the "raw material", I had suggested a Fox, so a Philly-made 16 gauge Sterlingworth was found that had mint bores and also ejectors (another must-have for the client), then the design, or more accurately, the redesign work began. Shortly thereafter, Beretta raised the bar by presenting the "Serpentina Black" which was again, completely smooth but this time all of the metalwork was finished in deep black and the gun was stocked in highly polished Gabon Ebony resulting in a gun that was blacker than a Spinal Tap album cover. Personally, I thought it looked great. I've long had an idea in the back of my mind for what I call the "Duesenberg" gun, that would be a gun with all of the metalwork left in the white and perfectly polished, with the "wood" finished in a deep gloss black lacquer, along with a few other car-inspired touches. I guess it could be called the "black and white" gun as well but it was a Duesenberg coupe that gave me the idea, hence the name. Obviously, the lacquer stock finish would preclude the gun's being used in any remotely realistic way, which is one reason the project had never progressed beyond the idea stage. I'd never actually considered stocking a gun in ebony until I saw the Serpentina Black, mainly because I'd always assumed that pieces of ebony that big were unobtainable. Realizing that that was an actual option and having secured a suitable billet of ebony (you think English walnut is pricey?), I contacted the client and suggested that we go with the "black and white" motif. He enthusiastically agreed. The gun will be completely devoid of engraving, checkering and even screw heads, in other words, completely smooth. Achieving this look necessarily also means that the relief cut in the frame that accommodates the forend iron must be dealt with. I've done that in the past with a spring-loaded, articulated cover but those were extractor guns. The ejector mechanism in this forend doesn't leave much room for the cover mechanism but, where there's a will, there's a way. Obviously, this is no cakewalk and will require major redesign and surgery but the end result will be like nothing else. Here goes.
First off, here are a couple of photos of the gun as received.


Here are some of the parts that will not be used. The topstrap, rib extension and forend lug will join this group as well.

After complete disassembly, the frame and triggerplate were annealed and the topstrap was removed in preparation for the new leverless piece. The dropped areas on the new topstrap are what will create the island safety. Converting the gun from a captured stock to a drawbolt stock killed two birds with one stone. It accommodated the island safety while hiding the breech screw in the most effective possible way, by getting rid of it. That bar of 1020 with the blue arrows pointing to it is the material from which the new topstrap was made.


Once the design of the sidelever and bolting mechanism was proven using wood mockups (old-school rapid prototyping), the actual parts were made in the steels appropriate for their role. Before I actually made the new bolt, and before the topstrap was welded in place, I took the opportunity to true up the bolt bore in the frame since they are neither round nor cylindrical as they came from the factory. They're also about as rough as a corncob internally as well. The form of the sidelever was taken almost directly from the Serpentina, per the client's request as that is his favorite single part of the gun. Aesthetically, it will work well in this application. Below are some photos of the roughed out sidelever and its inspiration, all prior to welding.


The topstrap/frame junction, after welding and rough shaping of the contours at the wood/metal interface. The lever is roughly shaped and the bolt and link are made. At this point, the only external frame shaping that's been done is that which is incidental to the structural modifications. Once all of the internal mechanisms are made, I'll get to the external shaping. The next items on the agenda are the return spring mechanism for the bolt and the safety mechanism, which will be unlike anything seen on a double, not a slide, roller or a lever. In case you're wondering, no, the sidelever does not pivot on the sear pin axis.


When I filed up the new topstrap, I left the safety island high because the top line of the hand portion of the stock would define the height of the island. Normally I don't start on the stock pattern until later in the process but much like when making a bar-in-wood design, the stock in this case determines the shape of certain elements, namely, the safety island. So I had to mock up at least the hand portion of the stock. The parts of the safety mechanism could not be made until the height and contour of the exposed surface was defined.


Here is the blank. Even at this exposure, it's apparent how black this piece of ebony is.

The bolt operating and auto-safety mechanism. Everything is still in the rough state and will be finished to the usual standards.


This is the portion of the sidelever that is driven by the above pictured lever. A simple roller may have sufficed but this is even smoother. Yes, it's an actual ball bearing.

The bolt closure and auto-safety linkage train.


A bit over three hundred hours from the start and it's again a functional gun, meaning that the bolting mechanism, lockwork, triggers and safety mechanism are made and fit. Everything pictured is bench-made, from the solid, properly heat-treated according to the particular material and hand-polished. The triggerguard will be made from the solid, rather than being fabricated, as is my usual practice. Part of the reason for this is because of the mounting method that will be employed, wherein there are no visible screws. Once that is finished, the external, cosmetic reworking can begin. After the "ordeal" of the sidelever conversion, that will be a welcome change of scenery.
I took no before photos of the inner workings in their stock form, so here are some photos of a Philadelphia-made, A-grade small frame, for comparison. Rumor has it that the "graded" guns were somehow "better finished" than the Sterlingworth. Much like the myth that the Philly guns were better than the Utica guns, this one holds no factual merit either.


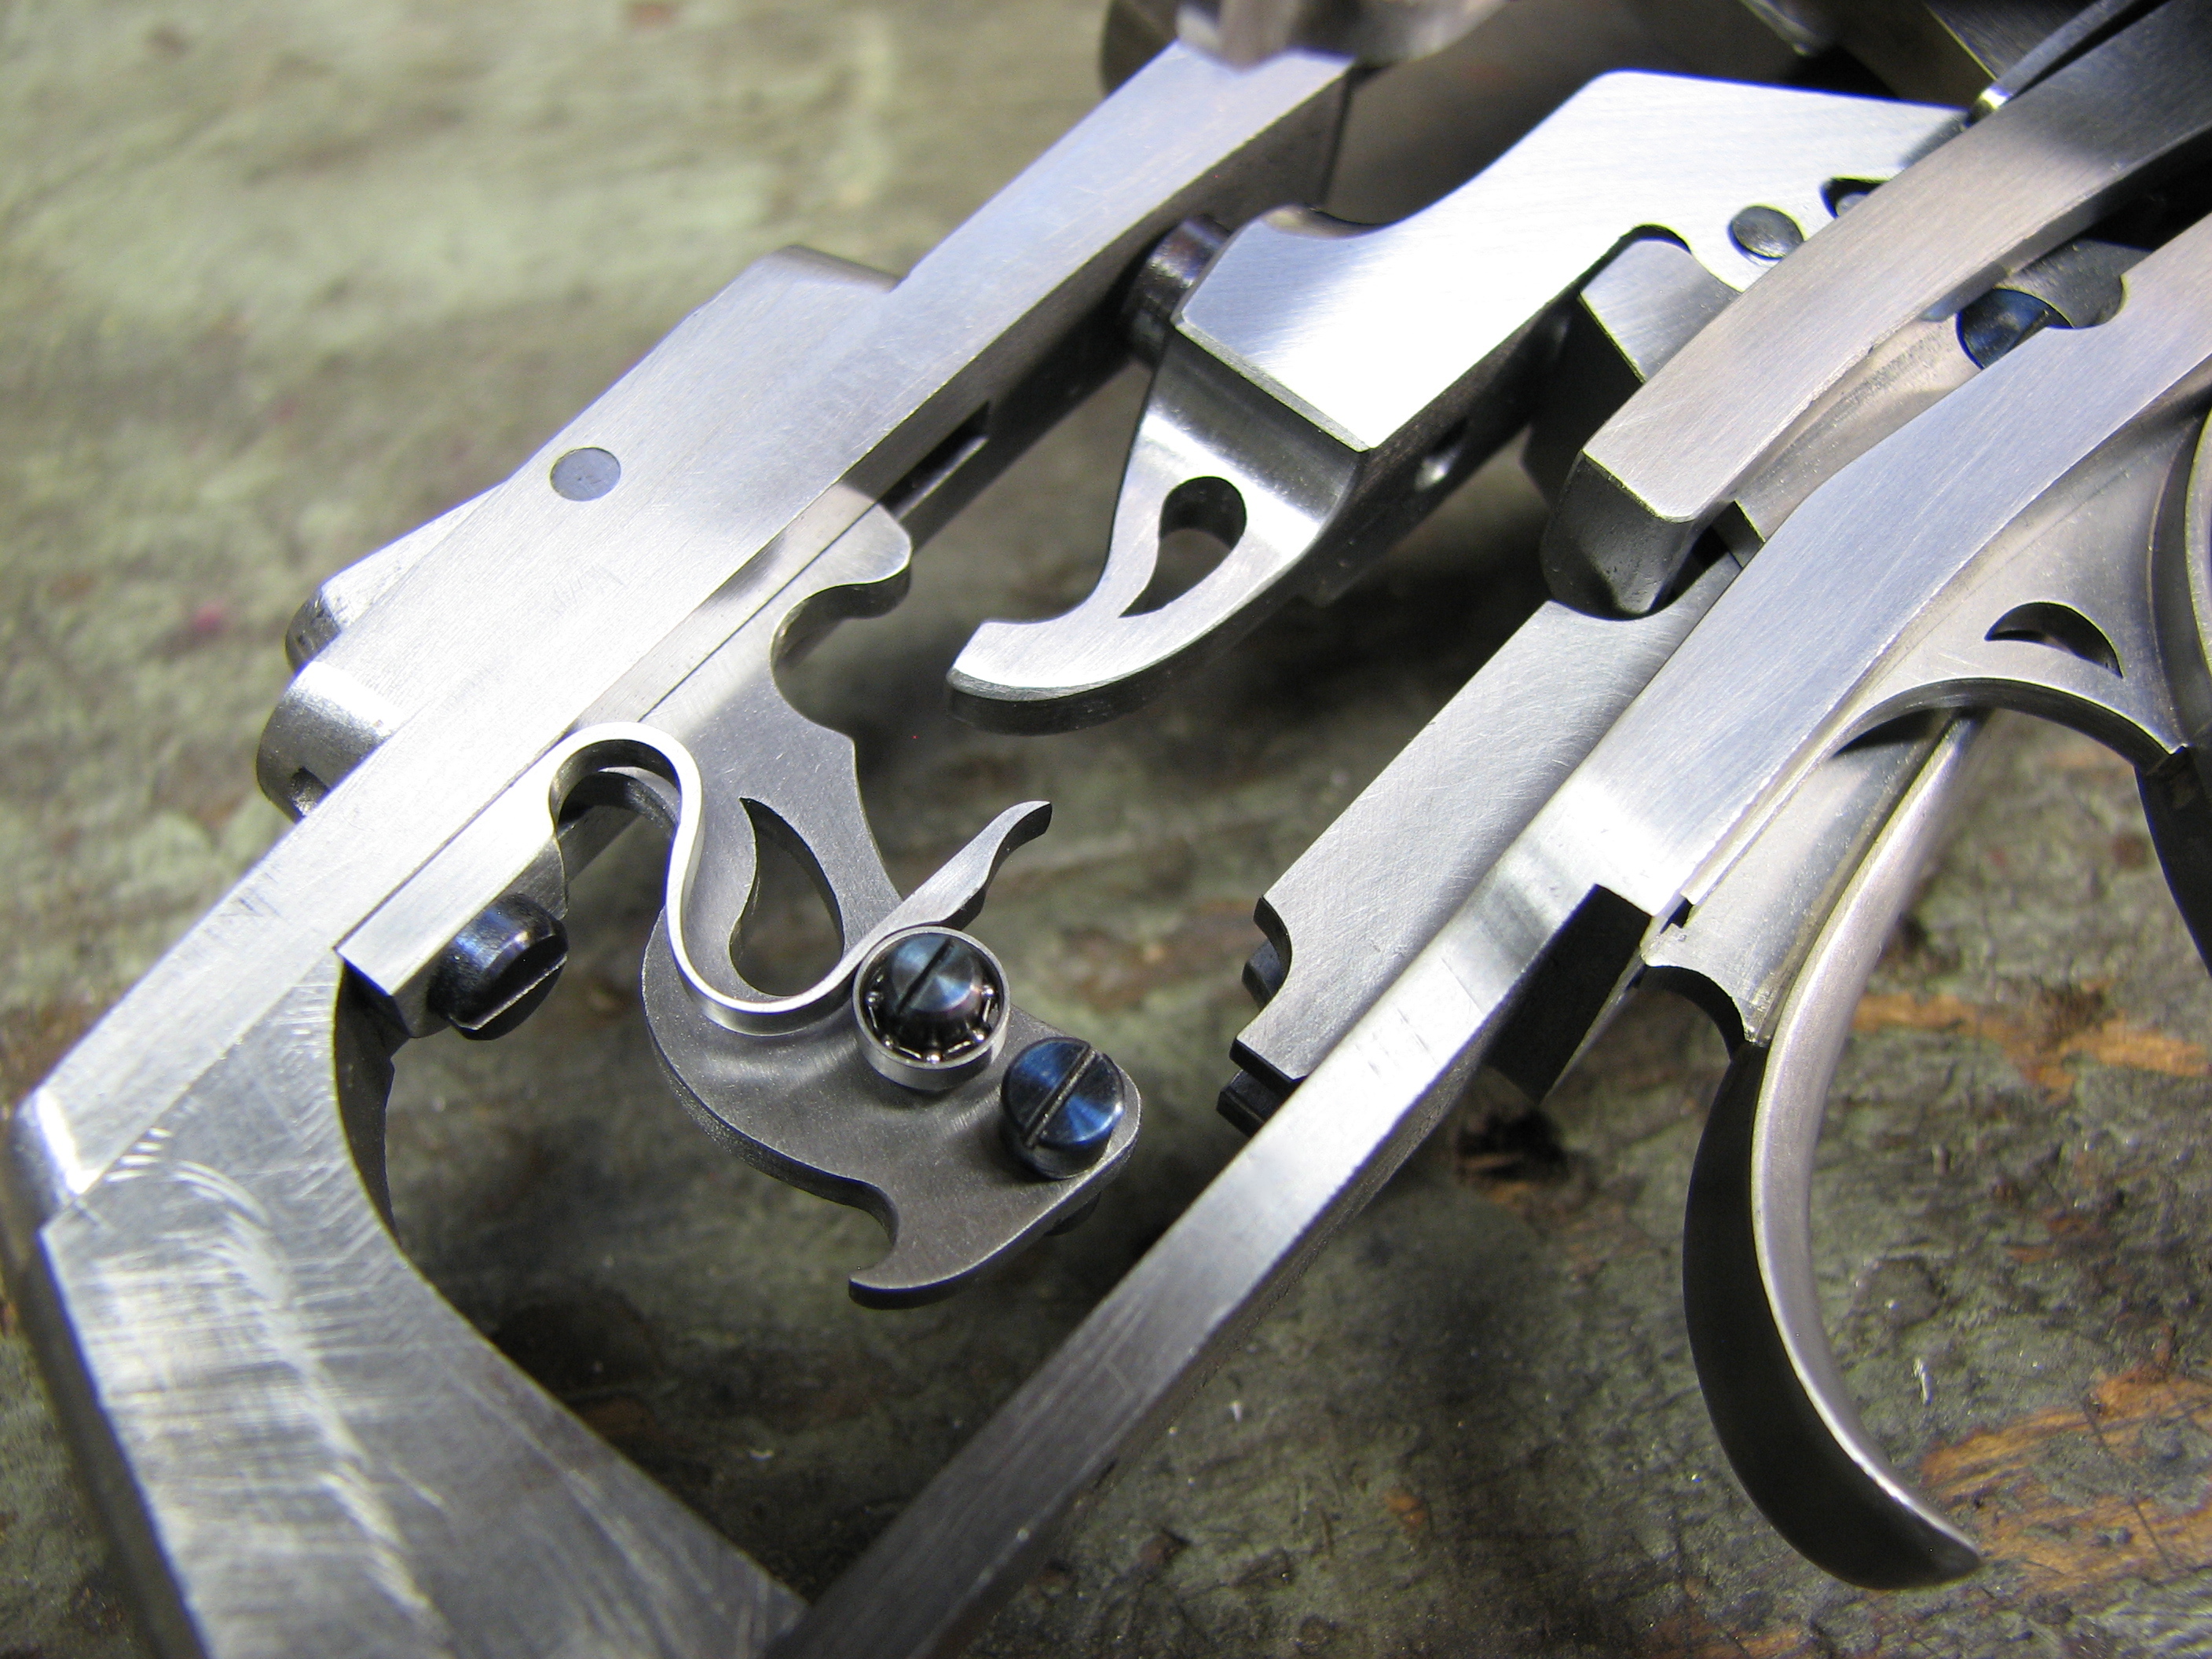


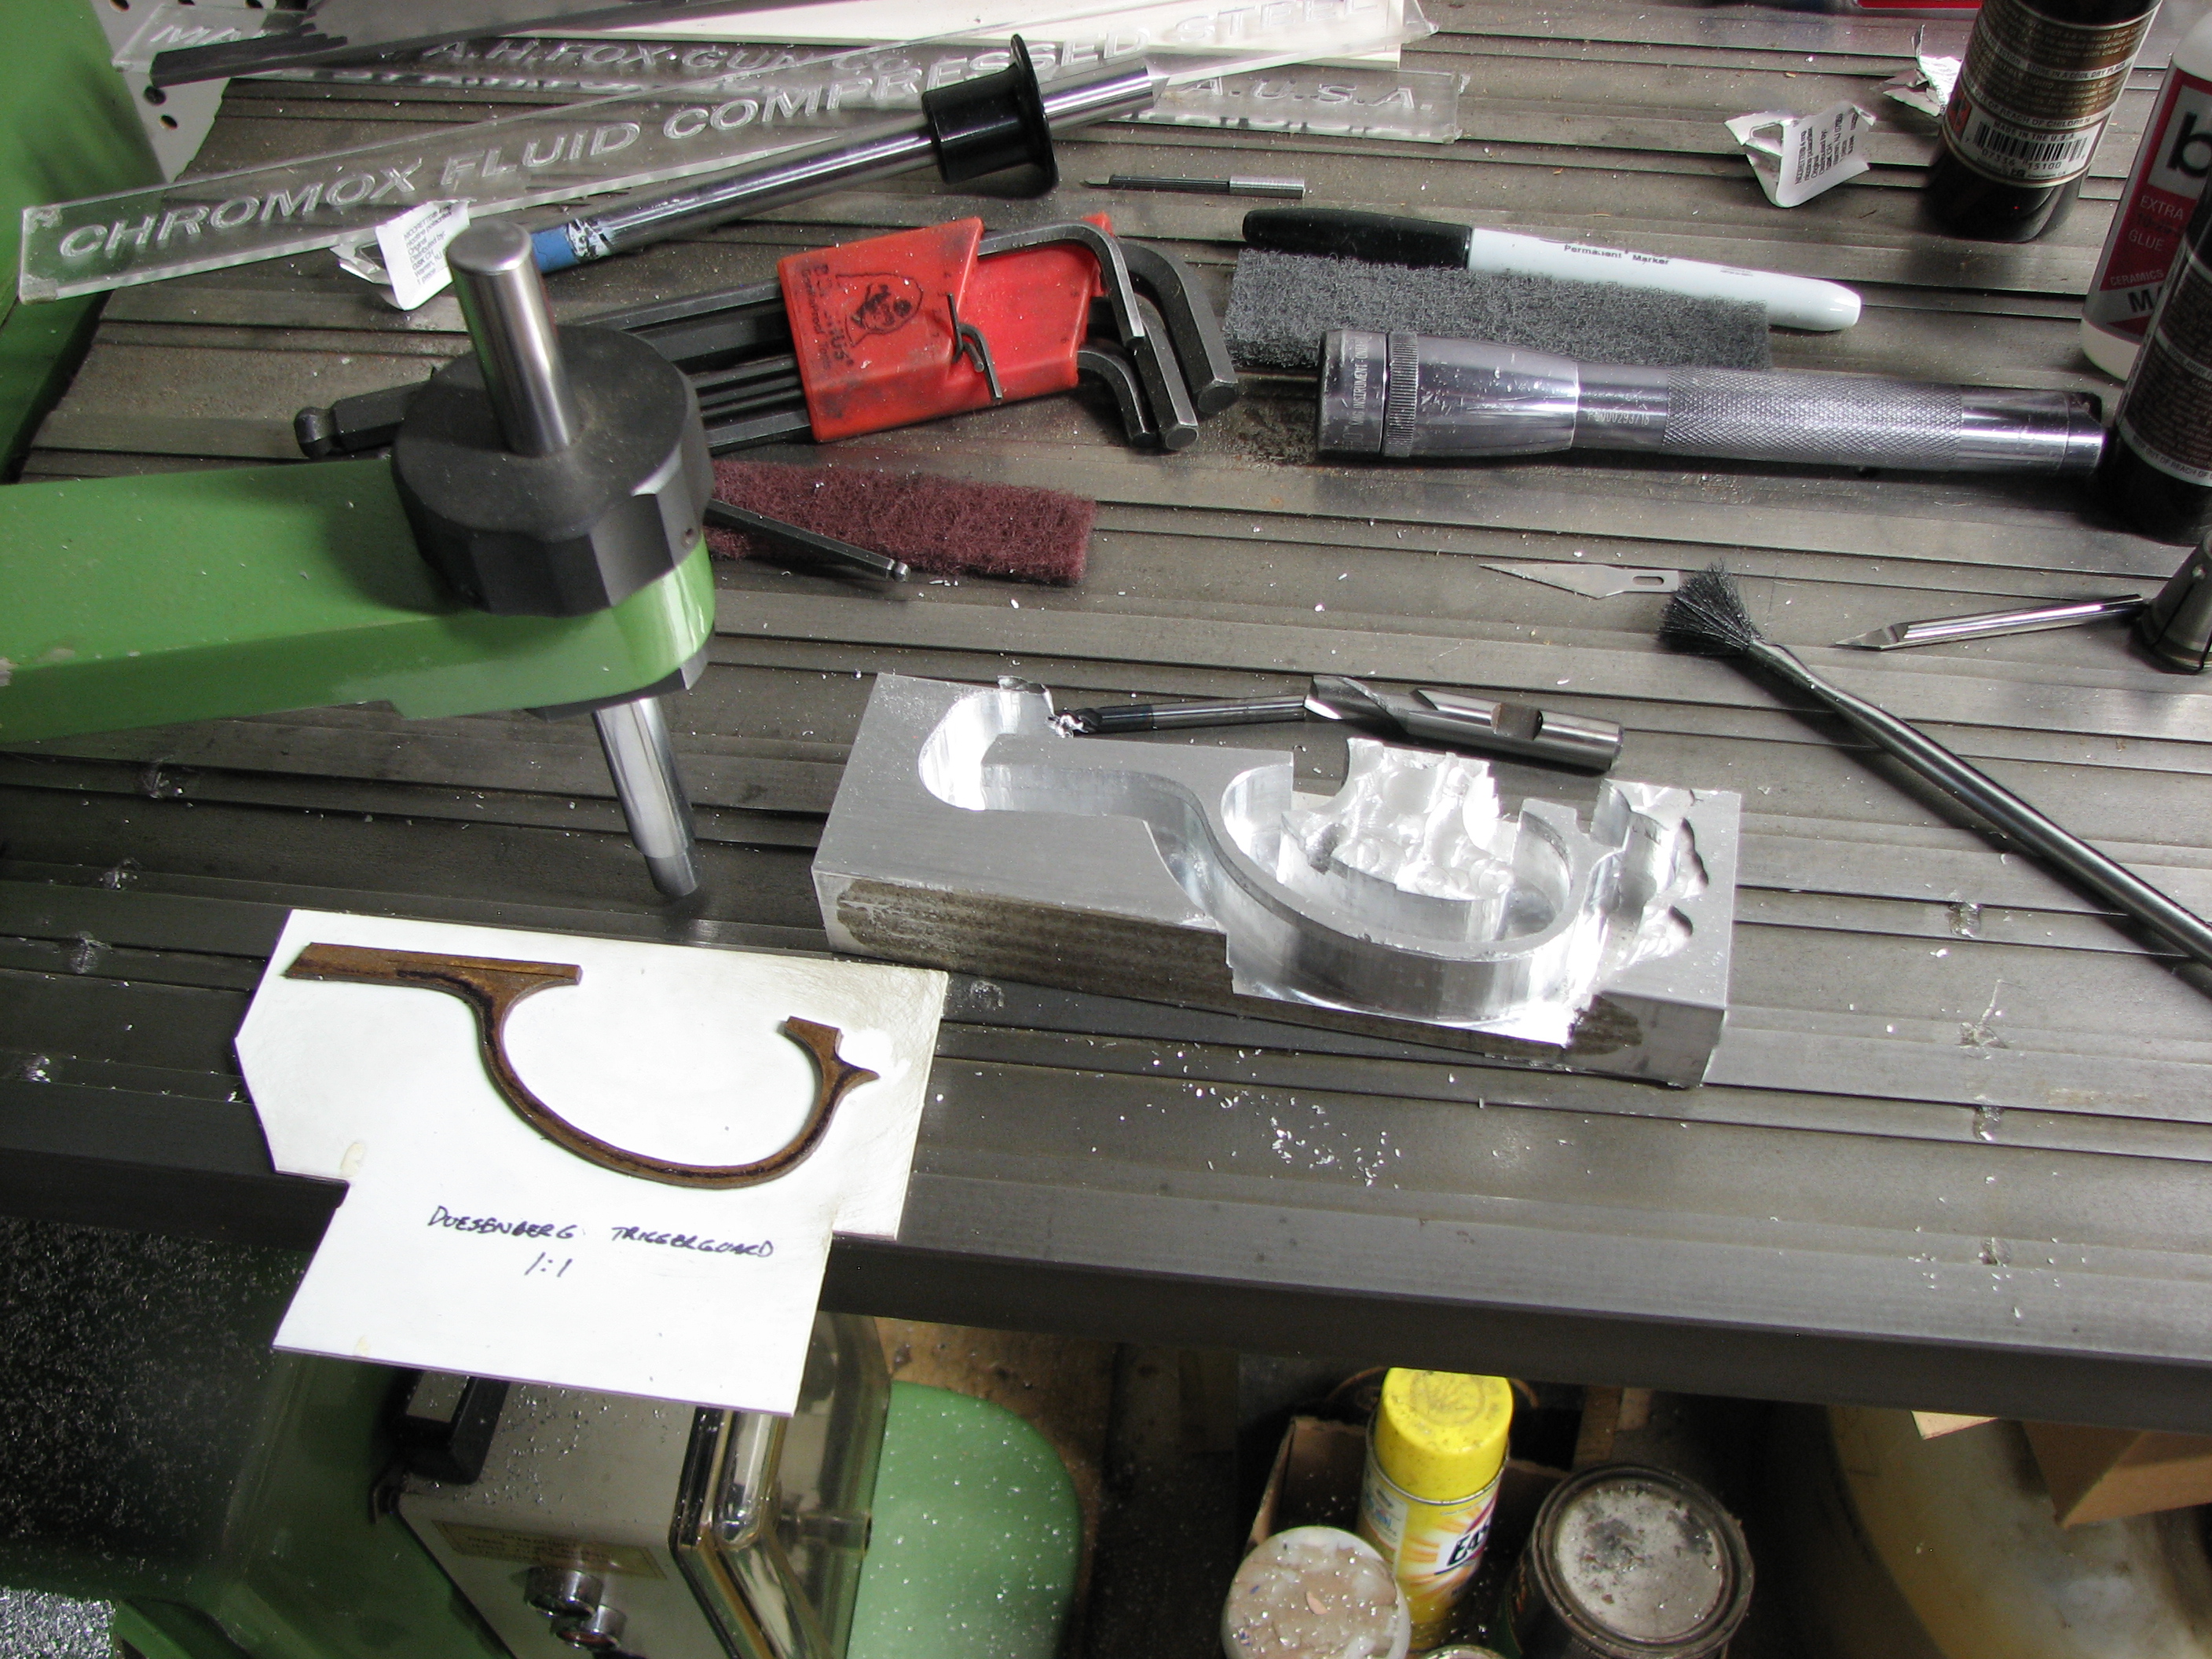
The side pedal and island safety conversion necessitated that the stock retention method be converted to a drawbolt (the block between the top and bottom straps is a temporary place-holder). This, combined with the desired "look" of the gun, meant that I had to design the triggerguard in such a manner that its screws are not visible externally. I made a template of the guard's profile, which I then used as a pantograph pattern. Once the profile of the guard was cut out, I made the mounting hardware (a screw at the rear and a sliding dovetail in the front) and then shaped the guard by hand.


Subscribe to:
Posts (Atom)