Craft Gunmaking, No compromises, No corners cut, EVER

Sunday, July 19, 2015

Light Remodel of a Utica Sterlingworth

This is a late Utica-built Fox Sterlingworth. These guns aren't known for their fit and finish and sadly, this particular gun was at one time the victim of some hack's buffing wheel. The goal of this project was to simply "clean up" the frame shaping and rectify as much of the buffing damage as possible. This is not a full-blown custom gun, just a minor facelift. I've included some video of the "heavier" work as well as photos. It's going to get simple single-line borders on the panels and a banner on each side with A.H. Fox inside.

Here it is after annealing, before any work was done.

Here is the right side with the fence done and the cheek flattened. I also continued the raised rib at the bottom of the fence up to the top of the side panel.

Here are some photos of the finished frame. All of the screws are of the pin spanner type which will hopefully discourage any "unauthorized entry" later. The floorplate screw hole was so badly funneled from the buffing wheel that I had to machine it to a larger diameter in order to get rid of the damage. Obviously a new screw with a larger head had to be made to fit the new hole.

The triggers were cleaned up and I filed a scroll into the web of the front trigger.

Here is the finished project.


Monday, July 6, 2015

A&A toplever spring replacement

Here's an A&A Model 453 with a failed toplever spring.   I fabricated and fit a new spring, as detailed below.

The failed original part, clearly the failure was the result of the toolmarks left on the surface of the original spring.


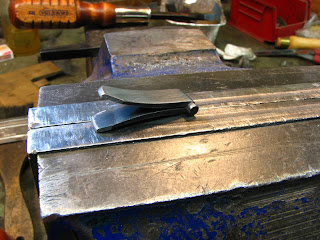
A piece of 1095 flat stock was selected then it was heated and forged over onto itself, forming what will become the V form of the spring.   It was then machined on both sides leaving enough material to hand file the locating stud.

Once the locating stud was filed, each limb was filed to shape.


The spring was wrapped in stainless wire to hold it while heating for hardening, and quenched in oil.
It was then tempered in a Nitre salt bath for the appropriate time and temperature.

After hardening and tempering, the part is polished (by hand) to deny cracks a starting point and it's ready to reinstall.


Repairing a Browning A5 stock

This isn't the usual type of shotgun that I work on but the owner is a good friend and client, so here it is.  It's a Remington-built, Browning-marked A5 with a buttstock broken at the hand and missing a couple of pieces.  If it were a Belgian-made Browning, it would have been more cost effective to simply replace the stock, but since it's a Remington-made gun that was not an option, as the stocks are different.

Here is the condition as received.


Once the finish was stripped, prepared the surfaces for the new pieces to be grafted in place.

The new pieces (with closely matching grain flow) were prepped and epoxied in place.  The piece from the other side was able to be salvaged.

Once the epoxy cured, I let the metal into the new wood and shaped the exterior contours to match the original shape.   I then laid out the missing part of the checkering pattern and recut it.


The stock will be refinished with amber shellac as original.