Monday, April 29, 2019

A Beautiful Percussion Purdey

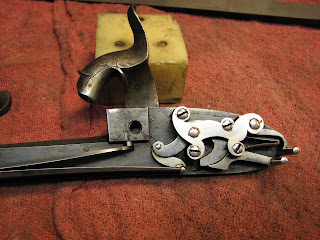
Here is a Purdey percussion double in 16 bore, made with the Wyatt/Purdey patent intercepting safety.  The gun is in outstanding, original condition, aside from some marks on the barrels.  I can only assume that these occurred during the removal of the breechplugs by an individual upon whom the benefits of opposable thumbs are clearly wasted.  The spring that powers the Wyatt interceptor in the right lock was also broken.  The owner could live with the marks in the barrels, given the gun's overall condition, but the lockwork needed to be put right.  That process will be detailed here.

The right side lock with the broken spring, and a bridle that had been scarred up by the wielding of an ill-fitting screwdriver by an uncaring slob of a gunsmiff.

You mean the screwdriver shouldn't be wider than the screwhead?, asks Bubba.  Left and right were similarly damaged.

The bridle after cleaning it up as much as practicable.

The spring that powers the safety sear is a single leaf with an eye that surrounds the foremost upper bridle post.  It also has a tab that keys into a slot in the lockplate to keep it from simply turning.  The leaf is .012" thick.  This is going to be fun.

I grabbed a piece of 7/32" thick 1095 and milled it a bit wider than the width of the original spring (including the locating tab).

Then the "eye" was drilled, in the mill, after locating the exact center.

The width is milled to within .010" of the finished size, leaving the locating tab "blank" standing.
The tab would be hand fit later.

The first side of the leaf is machined and the tool marks cleaned up by hand.

Given that the finished thickness of the leaf is .012", the question of how to hold the piece to remove the material from the second side arises.  The answer?  Soft solder.

The leaf is then machined to within .004" of final thickness.  It's finished by hand to remove any tool marks because I want the spring to (a) last more than a week, and (b) look like it should look.

The rest of the spring is filed up by hand, polished and the tip of the leaf curled as original.  Here it is next to the unbroken spring from the opposite lock.

The spring was hardened and tempered per the usual process, but with extreme care due to the fact that such a thin spring, after hardening, is apt to shatter just by looking at it too hard, to say nothing of dropping it or bending it in any way.  After tempering, it was polished and the lock reassembled.

Here's a video showing the operation of the safety sear.

The barrels, by James Purdey himself.

The inletting is what you'd expect: perfection.

A couple shots of the assembled gun.


Wednesday, April 24, 2019

Winchester '07

Here I'll detail making a new front sling eye for a Winchester 1907 Deluxe rifle.  The original went AWOL, which isn't that surprising considering the factory's method of attachment to the forend cap.
Externally, the new part is identical to the original but my attachment method uses an internal nut, contoured to fit the inside of the forend cap.  A small clearance cut is necessary in the forend wood to accommodate it but it's internal and completely hidden when the rifle is assembled. 


Notice

Effective immediately, and until further notice, I will take no more repair work.  I need to clear my backlog (what appears on this blog is only 8-10 percent of the work that comes through here) and take care of clients that have been far more than patient.  I regret any inconvenience that this may cause but by this time next year I should be in a position to take on more work.  This is an occupational hazard of being a one-man operation but it must be done in fairness to those that have been waiting for their work.


Monday, April 22, 2019

Contact Information

Dewey Vicknair

717-626-4226

dewey@vicknairrestorations.com

Visits are by appointment only.  I do not have a retail store and make no sales of guns or ammunition.

Sunday, April 7, 2019

Karma's a Bitch...

Apparently, a group of poachers were in Kruger National Park poaching rhinos (for their horns) when their day took a turn for the worse.  It seems that at least one of them was killed by one or more elephants and then eaten by lions.  I can hear the arguments now:  They were just trying to make money to feed their families, yada, yada.  Don't care, as I've said before: Can't feed 'em, don't breed em.   What I do care about is that there are some cultures amongst my species that still believe that, somehow, rhino horn is the cure for their micro-dick affliction or impotence.  Come on people, it's the 21st century, buy some damned Viagra because the rhino horn doesn't do anything.  The fact that the horns of these animals are taken for any reason, much less witchcraft, is completely unconscionable and incomprehensible.
It seems that four of the group were arrested and missed their chance to end up on the menu at Chez Lion.
https://www.yahoo.com/gma/suspected-poacher-killed-elephant-body-devoured-lions-officials-210155539--abc-news-topstories.html

https://abcnews.go.com/International/alleged-rhino-poachers-mauled-death-lions-south-africa/story?id=56400969

https://www.cnn.com/2019/04/07/africa/south-africa-rhino-poacher-eaten/index.html


Thursday, April 4, 2019

Pre-64 Model 70

I'm not really a "typical custom rifle kinda guy" but when a diversion from the doublegun world presents itself, I'm not likely to turn it down, especially when it's a referral from a good friend.  It's not that I don't appreciate a nicely done bolt-rifle, quite to the contrary, I just think that that particular segment of the market is bursting with competent builders and I see no need for another.

The victim is a custom Model 70 (by a well-known builder) that unfortunately took a tumble out of the gun cabinet.  While not successful in its escape attempt, it was the worse for it, with multiple and deep dents to the stock, some of which were in the beautifully checkered areas (ouch!).  Since it was here anyway, the owner wished to have its lack of "snap, crackle and pop" addressed as well.  That is what will be detailed here.  You might want to grab a coffee, it's going to be a long trip.

Some of the dents

With the dents addressed, it was time to address the owner's other areas of concern.  He wasn't happy with the square-fit forend tip and wanted one with a "widow's peak".  This was made with a piece of ebony.  I machined the spur and barrel channel on the mill but it was fit to the stock using smoke and scrapers.

Since ebony is an oily wood, I didn't trust epoxy alone to hold it in place, so I made a "strap" to hold it in place.  This was let into the barrel channel and it's anchored by the swivel stud and epoxy (dyed black so that the strap is not visible in the barrel channel).

With the forend tip secured, the shaping could be done.

The next agenda item was the swivel studs.  The "Dollar Store" look of the Uncle Mike's swivel bases wasn't going to cut it here but I also never liked the look of the exposed screws used in most "custom" installations.  So.....
And the rear....

Next, the cheapo-looking Pachmayr pad (basketweave face no less, UGH!) got the heave-ho.  Naturally, a spurred forend tip needs to be backed up with a spurred Silver's pad, right?  Right.

The owner felt that crossbolts were needed and, given that the rifle's caliber is .338 Winchester Magnum, I was inclined to agree.  I must admit that I used Talley's pre-fabricated bolts because I see no need to reinvent the wheel (at least not this time).  The stock is bolted into a fixture that is clamped in the mill and the fun begins.

The heads of the crossbolts are filed and polished flush.   Wow, they're ugly.

That's better.  The heads were shaped to a convex that is below the surface of the surrounding border.  When the border is polished after bluing, it gives the illusion of an escutcheon around the screw head.

The grip cap came under scrutiny next.  You might notice that the rear screw is not only misaligned, but it's actually off center.  This will not do.

That's better.  With the crossbolts being such a prominent feature of the rifle, and given my OCD-driven need for uniformity, I decided that all of the screws in the rifle would be of the pin spanner type and their heads would be of the same sunken, convex design as that of the crossbolt heads.  After welding the rear hole shut and recontouring the area, I milled the screw hole and pocket for the screw head on center.  I then added a shadow line around the base of the cap by hand filing.

Finally, the lower edge of the cheekpiece looked a bit unfinished.  A simple shadow line cured that.

Now we move on to the action.  The rifle was equipped with a Canjar (non set) trigger.  This is (in my opinion) one of the best aftermarket triggers (unfortunately, no longer made).  The problem is that the trigger shoe, while functional, is aesthetically lacking.  Clearly, this affront could not stand.
Yes, the new trigger IS asymmetrical.   It's a right-handed rifle, so the trigger is shaped for a right-handed user (exactly why the cheekpiece is only on the left side).

The bolt was next.  It was originally covered in "worm tracks" that looked like someone used a Dremel tool on it while resting their hands on a running paint shaker.  Whoever thought up this quick and (very) dirty alternative to proper finishing should be slapped, hard.  They also thought that the extractor would look neat nitre blued (can we just stop with that, please?).  The bolt, extractor and collar were repolished and properly finished, using the time honored techniques of those who've forgotten more about finishing than any "gunsmith" will ever know (that would be watchmakers).  The bolt handle was rust blued.

New action screws (all three) were made to match the pattern of the crossbolt heads, fitted and indexed and then the metalwork was all hand polished, in preparation for rust bluing.

All finished.  The stock was finished in real oil (not Tru-oil), hand cut to 2500 grit finish and the checkering recut.  Here are the "glamour shots"